Home Exercise Program for Rotator Cuff Recovery
Progressive rotator cuff rehab exercises your clients can do at home, from acute phase through return to function.
Rotator cuff injuries are among the most common shoulder conditions you'll treat in home health and outpatient settings. Whether your client is recovering from a surgical repair, managing a partial-thickness tear conservatively, or dealing with rotator cuff tendinopathy, the home exercise program is central to their recovery. The shoulder demands consistent, progressive loading to heal — and the vast majority of that loading happens outside your visits.
This guide covers the key exercises for each phase of rotator cuff recovery, with clinical reasoning to help you build programs that are both effective and realistic for home performance.
Understanding the Recovery Timeline
Rotator cuff rehabilitation timelines vary significantly based on whether the injury is managed conservatively or post-surgically, the size and location of the tear, repair quality, and individual factors like age and tissue health. The phases below represent general guidelines — always defer to the surgeon's protocol for post-operative cases and your clinical judgment for conservative management.
Phase 1: Protection and Gentle Mobility (Weeks 0–6 Post-Op / Early Conservative)
The initial phase prioritizes tissue protection while preventing excessive stiffness. For post-surgical clients, active-assisted range of motion is typically the ceiling. For conservative management, the focus is on pain-free movement and avoiding aggravating positions.
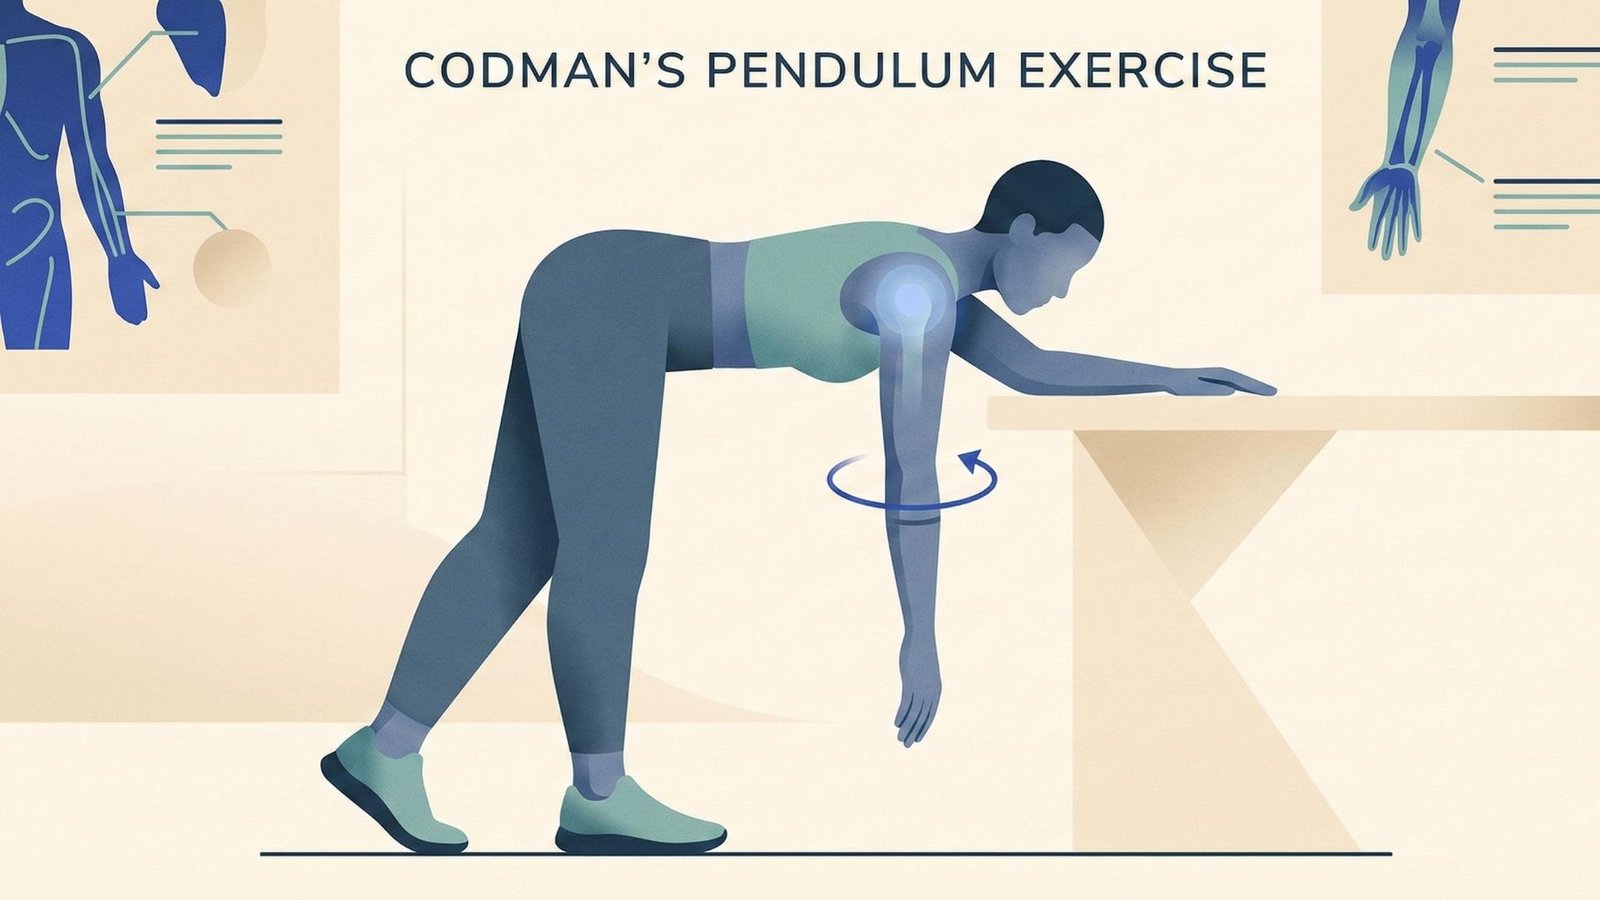
Shoulder Pendulums (Codman's Exercises)
Pendulums are the go-to early mobilization exercise for the post-op or acutely irritable shoulder. Have your client lean forward at the waist with the affected arm hanging freely, then create gentle circular or back-and-forth motions using body sway — not active muscle contraction. This provides gentle joint distraction and synovial fluid nutrition without stressing the repair. Instruct 1–2 minute sessions, multiple times daily.
Cane-Assisted Flexion
Using a cane, dowel, or broomstick, the uninvolved arm assists the involved arm into forward flexion in supine. This active-assisted motion allows controlled ROM progression without placing demand on the healing cuff. Progress range gradually — don't force through pain. Supine positioning uses gravity to assist rather than resist the motion.
Cane-Assisted External Rotation
In supine with the elbow at 90 degrees and tucked to the side, the cane provides assistance for external rotation. This is critical for preventing the internal rotation contracture that commonly develops post-operatively. Emphasize gentle, pain-free range with 5-second holds at end range.
Scapular Retraction (Scap Squeezes)
Gentle scapular retraction can begin early and is essential for restoring the scapulohumeral rhythm that's inevitably disrupted after a cuff injury. Cue "squeeze your shoulder blades together gently" while seated or standing. This is a low-risk exercise that activates the middle and lower trapezius without challenging the cuff repair.
Phase 2: Active Motion and Early Strengthening (Weeks 6–12)
As tissue healing progresses, the program transitions from passive and assisted movement to active range of motion and isometric strengthening. The goal is to restore functional motion while beginning to rebuild cuff and scapular stabilizer strength.
Active-Assisted to Active Flexion Progression
Gradually transition from cane-assisted motion to active shoulder flexion. Start in side-lying (gravity-minimized) if active motion against gravity is difficult. Progress to standing as strength allows. Watch for compensatory patterns like shoulder hiking or trunk leaning, which indicate the cuff isn't yet ready for the full demand.
Isometric External and Internal Rotation
Isometric strengthening at the doorframe or wall allows early cuff loading without the dynamic demands that could stress healing tissue. Push gently into the wall/doorframe with the elbow bent to 90 degrees. Hold for 5–10 seconds, starting at low intensity (25–30% max effort) and gradually increasing. These are the foundation for the dynamic strengthening that follows.
Shoulder Abduction with Cane Assist
Active-assisted abduction in the scapular plane helps restore overhead reach. The scapular plane (approximately 30 degrees forward of the coronal plane) is the most natural and least impinging position for shoulder elevation. Progress to active motion as tolerated.
Phase 3: Progressive Strengthening (Weeks 12–20)
With near-full range of motion restored, the focus shifts to building functional rotator cuff strength and endurance. This phase bridges the gap between basic motion and the demands of daily activities.
Side-Lying External Rotation
Lie on the uninvolved side with a small towel roll between the elbow and trunk. Rotate the forearm toward the ceiling against gravity. Start without weight and progress to 1–3 pounds as tolerated. This is one of the most effective exercises for isolating infraspinatus and teres minor. Control the eccentric lowering — don't let gravity do the work.
Standing Internal Rotation with Band
With a resistance band anchored at elbow height, perform internal rotation with the elbow tucked to the side. Subscapularis strengthening is often neglected in home programs but is essential for balanced cuff function. Light resistance with higher repetitions (15–20) is typically better tolerated than heavy loads.
Wall Slides
Standing facing a wall with forearms on the wall, slide the arms upward into flexion. This combines scapular upward rotation with cuff activation in a supported, low-threat position. It's an excellent bridge to overhead activities and helps retrain proper scapulohumeral rhythm.
Pec Stretch (Doorway)
Pectoral tightness commonly develops during the protective phase and contributes to a forward-rounded shoulder posture that places the cuff at a mechanical disadvantage. A gentle doorway pec stretch with the arm at 90 degrees of abduction helps restore anterior flexibility. Hold for 30 seconds, avoiding any stretch that reproduces shoulder pain.
Phase 4: Return to Function (Weeks 20+)
The final phase focuses on preparing the shoulder for the specific demands your client needs to return to — whether that's overhead reaching, carrying groceries, gardening, or recreational activities.
Bicep Curls and Tricep Extensions — Proximal arm strengthening supports the shoulder girdle during functional activities. These exercises are well-tolerated at this stage and help clients feel confident about using their arm normally again.
Functional Reaching Practice — Have your client practice the specific reaching patterns they need in daily life: overhead cabinet reaches, putting dishes away, washing hair, or reaching behind the back. Rehearsal of real-world tasks is the most effective way to restore confidence and function.
Clinical Pearls for Rotator Cuff HEPs
Pain is the guide. A small amount of discomfort during exercise is acceptable, but sharp pain or pain that persists more than 2 hours after exercise indicates you've pushed too far. Educate your clients on this distinction — many will either avoid all discomfort (limiting recovery) or push through significant pain (risking re-injury).
Ice after exercise, not before. In the early phases, 15–20 minutes of ice after the HEP can help manage the inflammatory response to loading. Avoid icing before exercise as it can mask pain signals that provide important feedback.
Keep it simple. A 4–5 exercise HEP performed consistently outperforms a 12-exercise program that overwhelms the client. Prioritize the exercises most relevant to the current phase and update the program as they progress.
Build Shoulder HEPs in Minutes
SendHEP's exercise library includes all the rotator cuff exercises covered here — pendulums, cane-assisted motions, scapular exercises, and progressive strengthening — with clear illustrations. Build and send a complete shoulder rehab HEP in under 2 minutes, then update it as your client progresses through each phase.